


This section outlines a few techniques for verifying the status of your installation. At this point you should have completed one of the guides for Installing PCC for SharePoint.
Before You Begin
Before you begin to verify your installation, clear files from the tempcache folder. Clearing the files from the tempcache folder will ensure that the full scope of product functionality is tested.
 |
Clearing the tempcache is especially important if you have previously installed Prizm Content Connect for SharePoint in the current or previous release. |
For Prizm Content Connect for SharePoint version 7.0 (and later), the default location of the tempcache is %allusersprofile%\Accusoft\Prizm\Cache\. You can verify this is the location that your Prizm Content Connect for SharePoint installation is using, or you can change the location of the tempcache by following the instructions in the Configuring Prizm Global Configuration section.
Test 1: Manual View
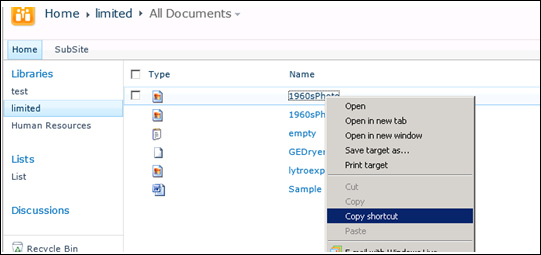
- Open a Document Library in Internet Explorer. The library must contain at least one document.
- Login as a user that has permission to view the library.
- Right-click on the name of the document in the Name column and select Copy shortcut from the Context menu. This will give a fully qualified URL for the document you are going to view.
- Open a new browser tab or window.
- In the URL bar enter the following:
http://<your_SharePoint_server>/_layouts/Accusoft/Prizm/ViewDocument.aspx?documentIdentifier=<fully_qualified_document_URL>
For Example:
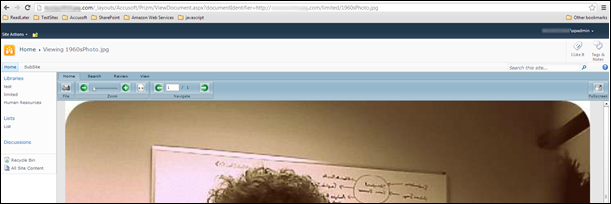
http://mysp.mydomain.com/_layouts/Accusoft/Prizm/ViewDocument.aspx?documentIdentifier=http://mysp.mydomain.com/limited/1960sPhoto.jpg
- The page that opens should look like the following example. The viewer will cover the bottom right of the page, and it will display the specified document.
If the viewer or the document does not display correctly, refer to Troubleshooting Tips.
Test 2: Check for Notifications
-
Open a site collection in Internet Explorer.
-
Log in as a site collection administrator.
-
Open Site Actions > Site Settings.
-
Under the section Site Collection Administration, click Site Collection Features.
-
Activate the feature Prizm Configuration Tools if it is not active.
-
Open Site Actions > Site Settings.
-
Under the section Prizm Configuration, click Prizm Site Permissions.
-
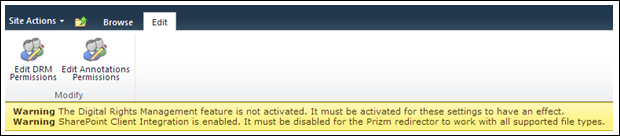
Look for notifications just below the ribbon, as shown in the following image:
This image above shows an example of two warnings you may encounter. Refer to the section, "Descriptions of Warnings" below for more information.
- Address each notification as they may indicate a problem that will prevent correct functionality.
Descriptions of Warnings
-
Warning The Digital Rights Management feature is not activated. It must be activated for these settings to have an effect.
-
You need to resolve this in order for the DRM functionality to work.
-
To resolve this you need to enable the Web Application feature Prizm Digital Rights Management for the current Web Application. Instructions for enabling this feature can be found in Enabling the DRM Redirector for a Web Application.
-
-
Warning SharePoint Client Integration is enabled. It must be disabled for the Prizm Redirector to work with all supported file types.
-
You need to resolve this in order for the DRM functionality to work correctly in all browsers and for all file types.
-
To resolve this you need to disable Client Integration for the Web Application. Instructions for doing this can be found in Working with Client Integration Features.
-
Test 3: Use Diagnostic Tools
 |
Diagnostic tools are provided to help both you and Accusoft debug a problematic installation and are not intended to be used in a typical verification of your installation. |
Instructions for installing and using the diagnostics tools are located in Troubleshooting Diagnostic Tools.